React Native CI/CD(Jenkins,Firebase)

React Native CI/CD (Continuous Integration/Continuous Deployment) is a streamlined process for automating the building, testing, and deployment of React Native applications. Leveraging tools like Jenkins and Firebase, this setup ensures efficient and consistent delivery of app updates to end-users.
Jenkins, a popular automation server, orchestrates the entire CI/CD pipeline. It coordinates tasks such as pulling code from version control systems like GitLab, running tests, and triggering deployments.
Firebase plays a crucial role in the deployment phase, particularly with Firebase App Distribution. This service simplifies the distribution of pre-release builds to testers, enabling rapid feedback cycles and ensuring the quality of the app before official release.
Together, Jenkins and Firebase empower developers to maintain high standards of code quality, automate repetitive tasks, and deliver React Native applications to users swiftly and reliably.
Steps for CI/CD in Mobile Apps (Android, iOS)
- Set up a macOS server machine and install the required tools and packages (Xcode CLI, Java JDK, Android SDK, CocoaPods, Node.js, npm, Firebase CLI).
- Install the stable version of Jenkins on the macOS server system and add the required/recommended plugins.
- Install the GitLab plugin to connect with the code repository (we are using GitLab as the code repository).
- Configure a global environment variable in Jenkins under “Global properties” to define the path where CLI tools and other executables reside.
- Create a Jenkins pipeline job and perform basic configuration.
- Create a Firebase project for Android and iOS, and enable Firebase App Distribution.
- Generate a Firebase service account in Firebase project settings.
- Add the pipeline script to the pipeline job.
- Set up a macOS server machine and install the required tools and packages (Xcode CLI, Java JDK, Android SDK, CocoaPods, Node.js, npm, Firebase CLI).
Setting up a macOS server involves installing macOS and Xcode for development essentials. Xcode provides the necessary Command Line Tools (CLT) for development tasks. Additionally, ensure Java JDK, Android SDK via Android Studio, and CocoaPods for dependency management are installed. Node.js and npm facilitate JavaScript development, while Firebase CLI manages Firebase services. Verify installations and configure environment variables such as JAVA_HOME and ANDROID_HOME for smoother operation. Test each tool to ensure proper functionality and compatibility.
2. Install the stable version of Jenkins on the macOS server system and add the required/recommended plugins.
To set up Jenkins on your macOS server, start by installing it using Homebrew. Open terminal and execute the command brew install jenkins-lts. Once installed, initiate Jenkins as a service using brew services start jenkins-lts. Access Jenkins through your web browser by entering http://localhost:8080. Complete the initial setup by following the on-screen instructions, which includes providing the initial admin password found at /Users/Shared/Jenkins/Home/secrets/initialAdminPassword.
3. Install the GitLab plugin to connect with the code repository (we are using GitLab as the code repository).
Install the GitLab plugin within Jenkins(“Manage Jenkins” > “Manage Plugins” > “Available”) to establish a connection with the GitLab code repository, ensuring seamless integration. Configure the plugin by adding the GitLab access token to authenticate Jenkins with the repository securely. Test the connection between Jenkins and GitLab to verify successful integration and communication. This ensures Jenkins can access and retrieve code from GitLab for automated build and deployment processes.

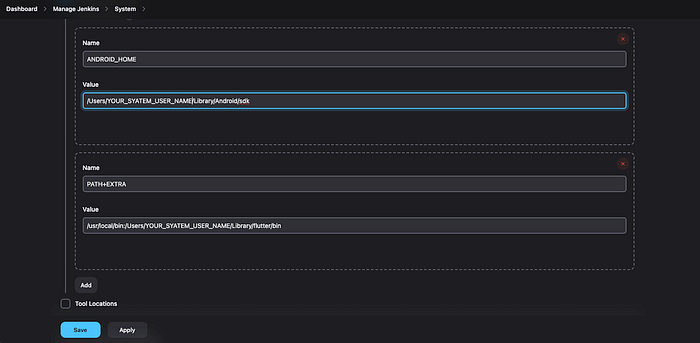
4. Configure a global environment variable in Jenkins under “Global properties” to define the path where CLI tools and other executables reside.
To ensure accessibility of CLI tools within Jenkins, navigate to the Jenkins dashboard and access the “Manage Jenkins” section. Under “Configure System,” locate “Global properties” and add a new environment variable. Name it appropriately, such as “PATH+EXTRA,” and specify the path where CLI tools and other executables are located. Additionally, set the “ANDROID_HOME” variable to the directory path of the Android SDK. Verify that all CLI tools mentioned earlier (Xcode CLI, Java JDK, Android SDK, CocoaPods, Node.js, npm, Firebase CLI) are accessible within Jenkins by testing their commands in Jenkins pipelines or shell scripts.
Some CLI tools are located in /usr/bin while others reside in /usr/local/bin. Therefore, it’s essential to include all the executable paths of these CLI tools in the PATH_EXTRA variable to ensure access to system CLI tools within Jenkins.
5. Create a Jenkins pipeline job and perform basic configuration.
To create a Jenkins pipeline job from the Jenkins dashboard by selecting “New Item” and choosing “Pipeline” as the job type. Proceed with basic configuration, such as providing a name and description for the pipeline job. Next, configure GitLab connections by adding a GitLab API token obtained from your GitLab account. This allows Jenkins to interact with the GitLab repository. Finally, define the pipeline script within the job configuration. This script outlines the stages and steps of your CI/CD process, specifying tasks such as building, testing, and deploying your application.


6. Create a Firebase project for Android and iOS, and enable Firebase App Distribution.
To create a Firebase project for Android and iOS, begin by logging into the Firebase Console and selecting “Add project.” Provide a name for your project and choose your desired region. Next, add your Android and iOS apps to the project, ensuring you specify the correct bundle ID for each platform. Once your apps are added, enable Firebase App Distribution for both Android and iOS platforms. This allows you to distribute pre-release versions of your app to testers for testing purposes. Additionally, create a tester group within Firebase App Distribution and add testers to it. This group enables you to manage access to pre-release versions of your app and streamline the testing process by providing testers with easy access to the latest builds.

7. Generate a Firebase service account in Firebase project settings.
To generate a Firebase service account in Firebase project settings, begin by accessing the Firebase Console and selecting your project. Within the project settings, navigate to the “Service accounts” tab. Proceed to generate a new private key under “Firebase Admin SDK” settings. Upon generation, download the JSON key file containing your service account credentials to your local machine. This JSON key file serves as the authentication mechanism for your Firebase Admin SDK.

Now, in Jenkins, securely store this JSON key file as a Jenkins credential. Access the Jenkins dashboard, navigate to “Credentials,” and select “Add Credentials.” Choose the appropriate credential type, such as “Secret file” or “Google Service Account from private key.” Upload the JSON key file and provide necessary details like the credential ID and description. Save the credentials to Jenkins. Now, within your Jenkins pipelines or jobs, you can securely access this Firebase service account credential for authentication.

7. Add the pipeline script to the pipeline job.
In the pipeline script, there are seven stages for building, including specific stages for React Native. You can customize these stages according to your project needs. For instance, if you’re working with Flutter, you can remove React Native installations and add stages specific to Flutter. Adapt the pipeline by adding, removing, or editing stages to align with your project requirements and technology stack.
Pipeline environment setups >
environment {
 PROJECT_REPO = 'YOUR_PROJECT_REPO'
 BRANCH = 'BRANCH_TO_BUILD'
 XCODE_SCHEME = 'YOUR_PROJECT_SCHEME'
 XCODE_PROJECT_XCWORKSPACE = 'YOUR_PROJECT.xcworkspace'
 IOS_EXPORT_PLIST = "ExportOptions.plist"
 IOS_BUILD_PATH = "ios/build/"
 IOS_BUILD_FILE_NAME = "YOUR_PROJECT_NAME"
 ANDROID_BUILD_PATH = "android/app/build/outputs/apk/release/"
 ANDROID_BUILD_FILE_NAME = "app-release"
 FIREBASE_IOS_APP_ID = 'YOUR_FIREBASE_IOS_APP_ID_FROM_FIREBASE_SETTINGS'
 FIREBASE_ANDROID_APP_ID = 'YOUR_FIREBASE_ANDROID_APP_ID_FROM_FIREBASE_SETTINGS'
 TEST_GROUP = 'YOUR_PROJECT_TESTER_GROUP_FROM_FIREBASE'
 GOOGLE_APPLICATION_CREDENTIALS = credentials('firebase_service_account')
 RELEASE_NOTE_FILE_PATH = 'release_note.txt'
}
Firebase app ID can be found in the Firebase settings. For iOS export, ExportOptions.plist must be present in the project’s ios/ folder, and a release_note file in the project root folder should contain release notes. GOOGLE_APPLICATION_CREDENTIALS refers to the service account file created in step 7, stored in the Jenkins credentials accessed using credentials(‘NAME_OF_FILE_IN_JENKINS’).
Stage 1 >
        stage('Checkout') {
            steps {
                // Checkout the code from your Git repository
                git branch: "${BRANCH}", url: "${PROJECT_REPO}"
            }
        }
In this stage, the pipeline checks out the latest code from the specified repository and branch. GitLab authentication is performed using a token added in step 3 of GitLab configuration. This step ensures that the pipeline operates on the most up-to-date codebase.
Stage 2 >
        stage('Install React Native Packages') {
            steps {
                    sh "rm -rf node_modules/"
                    sh "rm -rf package-lock.json && rm -rf yarn.lock"
                    sh "npm install"
            }
        }
In this stage, the pipeline first removes the node_modules directory if it already exists in the project folder. It also removes the package-lock.json and yarn.lock files to ensure clean dependency installation. Following this cleanup, the pipeline proceeds to install the React Native packages required for the project.
Stage 3 >
        stage('Install CocoaPods') {
            steps {
                sh "cd ios && rm -rf Pods && rm -rf Podfile.lock"
                sh "cd ios && pod install"
            }
        }
In this stage, the pipeline removes the pods folder and podfile.lock from the iOS directory to ensure a clean installation environment. Afterward, it proceeds to install the pod dependencies required for iOS build.
Stage 4 >
        stage('Build APK') {
            steps {
                script {
                    sh "cd android && ./gradlew clean"
                    sh "cd android && ./gradlew assembleRelease"
                }
            }
        }
In this stage, the pipeline focuses on building an Android APK using the release keystore. It involves compiling the code and packaging it into a signed APK file suitable for distribution.
Stage 5 >
       stage('Archive IOS') {
            steps {
                script {
                    sh "cd ios && xcodebuild -workspace ${XCODE_PROJECT_XCWORKSPACE} -scheme ${XCODE_SCHEME} clean archive -archivePath ${IOS_BUILD_PATH}${IOS_BUILD_FILE_NAME}.xcarchive"
                }
            }
        }
In this stage, the pipeline archives the iOS project using the distribution certificate. The resulting archive is then stored in the designated folder, prepared for future distribution or deployment. All variables used in this process are declared in the environment setup, ensuring consistent and reliable execution.
Stage 6 >
        stage('Export IPA') {
            steps {
                script {
                    sh "cd ios && xcodebuild -exportArchive -archivePath ${IOS_BUILD_PATH}${IOS_BUILD_FILE_NAME}.xcarchive -exportPath ${IOS_BUILD_PATH} -exportOptionsPlist ${IOS_EXPORT_PLIST}"
                }
            }
        }
In this stage, the pipeline exports the archived iOS project to an IPA file using an ad-hoc provisioning profile and distribution certificate, directing it to a specified path. Utilizing the exportOptionsPlist flag, we reference the IOS_EXPORT_PLIST file containing details such as the ad-hoc profile and certificate, including app ID information. This process ensures the creation of a deployable iOS application ready for ad-hoc distribution or testing.
ExportOptions.plist->
<?xml version="1.0" encoding="UTF-8"?>
<!DOCTYPE plist PUBLIC "-//Apple//DTD PLIST 1.0//EN" "http://www.apple.com/DTDs/PropertyList-1.0.dtd">
<plist version="1.0">
<dict>
    <key>method</key>
    <string>ad-hoc</string> <!-- Distribution method: ad-hoc, app-store, enterprise, development -->
    <key>teamID</key>
    <string> </string> <!-- Your Apple Developer Team ID -->
    <key>compileBitcode</key>
    <false/>
    <key>uploadBitcode</key>
    <false/>
    <key>uploadSymbols</key>
    <true/>
    <key>signingCertificate</key>
    <string>iPhone Distribution: YourDistributionCertificate</string> <!-- Distribution Certificate -->
    <key>provisioningProfiles</key>
    <dict>
        <key>com.yourcompany.yourapp</key> <!-- Bundle Identifier -->
        <string>YourAdHocProvisioningProfileUUID</string> <!-- Ad Hoc Distribution Provisioning Profile UUID -->
    </dict>
</dict>
</plist>
Stage 7 >
        stage('Firebase Distribution') {
            steps {
                script {
                    sh "firebase appdistribution:distribute ${ANDROID_BUILD_PATH}${ANDROID_BUILD_FILE_NAME}.apk --app ${FIREBASE_ANDROID_APP_ID} --groups ${TEST_GROUP} --release-notes-file ${RELEASE_NOTE_FILE_PATH}"
                    sh "firebase appdistribution:distribute ${IOS_BUILD_PATH}${IOS_BUILD_FILE_NAME}.ipa --app ${FIREBASE_IOS_APP_ID} --groups ${TEST_GROUP}  --release-notes-file ${RELEASE_NOTE_FILE_PATH}"
                }
            }
        }
In this stage, the pipeline distributes the Android APK and iOS IPA files to Firebase App Distribution corresponding to their app IDs, along with a release note and tester group. Firebase CLI authentication is facilitated by referencing the GOOGLE_APPLICATION_CREDENTIALS variable declared in the environment setup, containing the Firebase service account created in step 7.
Full Pipeline script ->
pipeline {
    agent any

    environment {
        PROJECT_REPO = 'YOUR_PROJECT_REPO'
        BRANCH = 'BRANCH_TO_BUILD'
        XCODE_SCHEME = 'YOUR_PROJECT_SCHEME'
        XCODE_PROJECT_XCWORKSPACE = 'YOUR_PROJECT.xcworkspace'
        IOS_EXPORT_PLIST = "ExportOptions.plist"
        IOS_BUILD_PATH = "ios/build/"
        IOS_BUILD_FILE_NAME = "YOUR_PROJECT_NAME"
        ANDROID_BUILD_PATH = "android/app/build/outputs/apk/release/"
        ANDROID_BUILD_FILE_NAME = "app-release"
        FIREBASE_IOS_APP_ID = 'YOUR_FIREBASE_IOS_APP_ID_FROM_FIREBASE_SETTINGS'
        FIREBASE_ANDROID_APP_ID = 'YOUR_FIREBASE_ANDROID_APP_ID_FROM_FIREBASE_SETTINGS'
        TEST_GROUP = 'YOUR_PROJECT_TESTER_GROUP_FROM_FIREBASE'
        GOOGLE_APPLICATION_CREDENTIALS = credentials('firebase_service_account')
        RELEASE_NOTE_FILE_PATH = 'release_note.txt'
    }


    stages {
        stage('Checkout') {
            steps {
                // Checkout the code from your Git repository
                git branch: "${BRANCH}", url: "${PROJECT_REPO}"
            }
        }

        stage('Install React Native Packages') {
            steps {
                    sh "rm -rf node_modules/"
                    sh "rm -rf package-lock.json && rm -rf yarn.lock"
                    sh "npm install"
            }
        }

        stage('Install CocoaPods') {
            steps {
                sh "cd ios && rm -rf Pods && rm -rf Podfile.lock"
                sh "cd ios && export LC_ALL=en_US.UTF-8 && pod install"
            }
        }

        stage('Build APK') {
            steps {
                script {
                    sh "cd android && ./gradlew clean"
                    sh "cd android && ./gradlew assembleRelease"
                }
            }
        }

        stage('Archive IOS') {
            steps {
                script {
                    sh "cd ios && xcodebuild -workspace ${XCODE_PROJECT_XCWORKSPACE} -scheme ${XCODE_SCHEME} clean archive -archivePath ${IOS_BUILD_PATH}${IOS_BUILD_FILE_NAME}.xcarchive"
                }
            }
        }

        stage('Export IPA') {
            steps {
                script {
                    sh "cd ios && xcodebuild -exportArchive -archivePath ${IOS_BUILD_PATH}${IOS_BUILD_FILE_NAME}.xcarchive -exportPath ${IOS_BUILD_PATH} -exportOptionsPlist ${IOS_EXPORT_PLIST}"
                }
            }
        }

        stage('Firebase Distribution') {
            steps {
                script {
                    sh "firebase appdistribution:distribute ${ANDROID_BUILD_PATH}${ANDROID_BUILD_FILE_NAME}.apk --app ${FIREBASE_ANDROID_APP_ID} --groups ${TEST_GROUP} --release-notes-file ${RELEASE_NOTE_FILE_PATH}"
                    sh "firebase appdistribution:distribute ${IOS_BUILD_PATH}${IOS_BUILD_FILE_NAME}.ipa --app ${FIREBASE_IOS_APP_ID} --groups ${TEST_GROUP}  --release-notes-file ${RELEASE_NOTE_FILE_PATH}"
                }
            }
        }
    }
}
Note: Firebase initialization is required in the project. It is not mandatory for the Firebase App and Firebase App Distribution accounts to be the same. Additionally, ensure that the ExportOptions.plist is located in the ios/ folder, and the release_note.txt file is in the project’s root folder within the project repository.